Are you thinking about deleting your Facebook Account?
We don’t blame you! Facebook’s long been known to take, store, and sell your data, which raises alarm bells when it comes to your privacy.
If you’re serious about deleting your Facebook account, then rest assured, we’ve got you covered.
It used to be a long-drawn-out process, but that’s all changed, and it’s now easier than ever to delete your account.
We’ve put together a guide showing you how to delete your Facebook account or deactivate it if you’d prefer to put it on ice for a while and mull it over.
So, whether you want to take a break from Facebook, or permanently delete your account once and for all, here’s how.
Let’s get started!
How to Delete Your Facebook Account
This how-to guide and figures mentioned below have been compiled from various sources around the web, such as Facebook & Wikipedia.
Here’s how to delete your Facebook account:
Before you Delete Your Facebook Account
Download and Archive Your Data
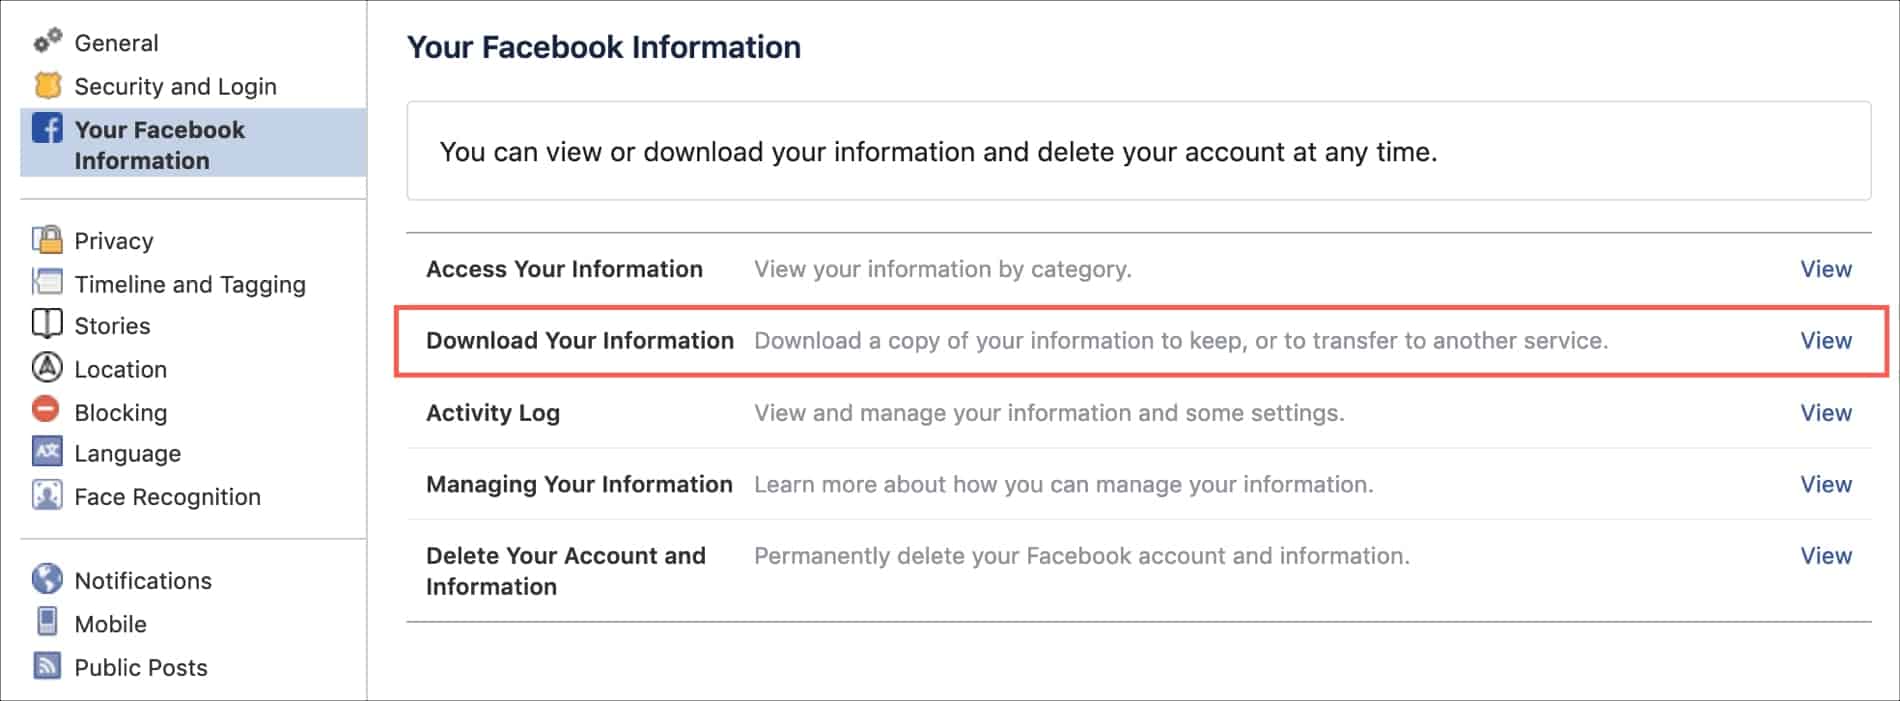
Before you go ahead and permanently delete your Facebook account, it would be wise to back up your content from Facebook’s servers, just in case you want to use it in the future.
Luckily, Facebook makes this process easy and recommends that you make a copy of your data before deleting your account.
All you have to do is:
- Go to “Your Facebook Information Page.“
- Click on “Download your Information.”
- Choose the media quality, archive format, and set a date range.
- Your information will appear first, but scroll down the page to choose information about you as well.
- Once you’re ready, click on the blue “Create File” button, and the archiving process will begin.
- You can keep an eye on it by viewing the “Available Files tab.”
- Once complete, click “Download,” and you’re done.
Revoke App Permissions
It’s also a good idea to revoke any app permissions that you’ve linked to your account.
To do this, you’ll need to:
- Go to Facebook’s App Settings
- Revoke app permission and turn off Facebook integration on your phone or tablet
- Log out and delete the Facebook app from your phone and tablet.
- Disable Messenger and all associated apps.
- Look for and disconnect any other apps, like Spotify.
Once complete, you’re ready to delete your Facebook account permanently. However, should you still have any doubts, try deactivating it for a while instead.
Deactivating vs. Deleting Facebook? – What’s the Difference?
If you’re not 100% ready to delete your Facebook account yet, but you’d like to take some time off the social media platform instead, deactivating your account is the better option.
Once you deactivate your account, all of your information will still be stored in Facebook’s database, ready to reactivate at any point. All you’d have to do is log into your account with the same username, email address, phone number, and password, and you’ll be good to go.
According to Facebook, if you deactivate your account, “People can’t see your timeline or search for you,” and “You can reactivate whenever you want.”
Whereas if you choose to delete your account permanently, Facebook erases your data, meaning you’ll have to create a brand new account to use the platform again, and Facebook makes it clear that “You can’t regain access once it’s deleted.”
So, if your still not sure about permanently deleting your Facebook account, follow the steps below to deactivate it instead:
How to Deactivate Your Facebook Account
1. Go to Facebook
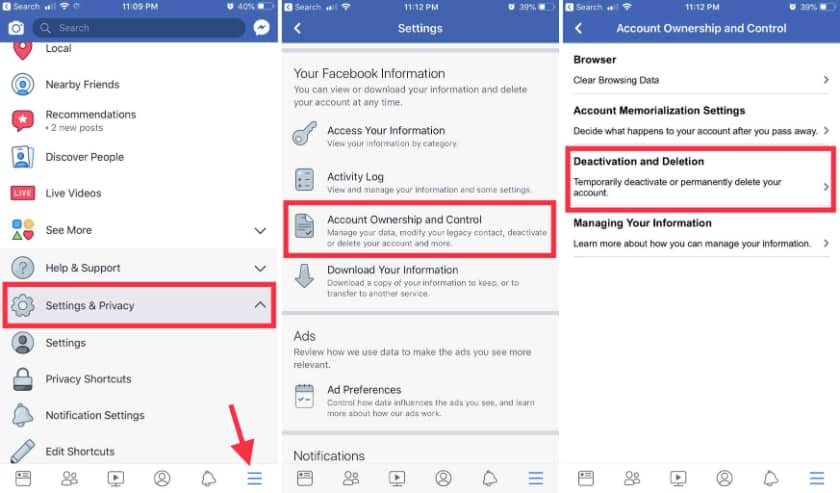
Load Facebook in your browser, click the small drop-down arrow in the top right-hand corner, and select “settings” from the list.
2. Click “Your Facebook Information”
Click on “Your Facebook Information” from the pane on the left-hand side of the page.
Once the page loads, select “Deactivation and Deletion” from the list of options.
3. Select “Deactivate Account”
You’ll see a small radio button next to “Deactivate Account,” select it and click “Continue to Account Deactivation” to continue.
4. Provide a Reason
On the next page, you’ll be asked to provide a reason why you’d like to deactivate your account. Choose from the list of options and decide if you want to keep using Messenger. If not, you’ll have to disable it separately, as mentioned above.
Click “Deactivate” to proceed.
5. Click “Deactivate Now”
Facebook will ask you to provide your password to confirm deactivation and prompt you with one final warning message.
Read the warning message and click “Deactivate Now” when you’re ready to proceed. Facebook will then sign you out, and you’ll return to the “Log into Facebook” page.
How to Permanently Delete Your Facebook Account
1. Go to Facebook
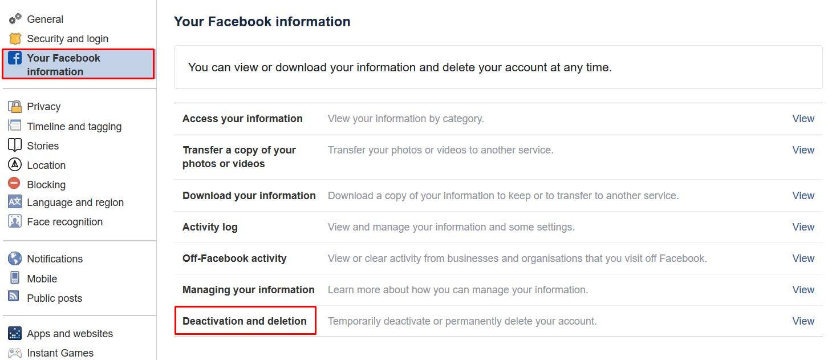
Log into your Facebook account and navigate to your “Settings” page, located in the drop-down menu that appears when you click the drop-down arrow in the top right-hand corner of the page.
2. Click “Your Facebook Information”
Click on “Your Facebook Information” from the pane on the left-hand side of the page.
Once the page loads, select “Deactivation and Deletion” from the list of options.
3. Select “Permanently Delete Account”
You’ll see a small radio button next to “Permanently Delete Account,” select it and click “Continue to Account Deactivation” to continue.
4. Click “Delete Account”
At this stage, Facebook will prompt you with a warning that details the ramifications of permanently deleting your account.
Make sure to read the warning and click the “Delete Account” button if you’re 100% sure it’s the right choice.
5. Enter Password & Continue
The final step in the process is to enter your password and click continue. Once done, your Facebook account will be permanently deleted.
How to leave other Facebook-owned services
The chances are that if you’ve got a Facebook account, then you’ve also got Instagram and WhatsApp accounts.
So, if you really want to clear your data from the Social Media behemoth that is Facebook, then you’ll also want to consider deleting these accounts as well as Facebook owns them.
Summary
We hope our how to delete your Facebook account guide was helpful?!
Having a Facebook account does have its benefits, both personally and professionally.
However, the more our lives move into the digital age, the more data protection and privacy become essential. With that in mind, companies like Facebook need to make sure that they’re keeping their users safe, or more people will continue to delete their accounts.
Here’s a quick recap of how to permanently delete your Facebook account:
- Go to Facebook
- Click “Your Facebook Information”
- Select “Permanently Delete Account”
- Click “Delete Account”
- Enter “Password & Continue”
How to delete Facebook Page using Android and iPhone: Step-by-step guide
You can delete Facebook pages both on a computer and on the mobile app. Here is a step-by-step guide you can follow to delete your Facebook Page using Android and iPhone.

Facebook is one of the most popular social media platforms across the world. By signing up on Facebook, you can communicate with people across the globe. You use Facebook for personal as well as for business purposes. Your Facebook profile contains your personal information whereas a Facebook Page carries information about businesses, groups, and individuals. Now, if you already have a Facebook page and you want to delete it for any reason, it's useful to know that there are various ways to do so.
You can delete Facebook pages both on a computer and on the mobile app. However, it's important to understand deleting your Facebook Page is different from deactivating your account -- once deleted, it can never be recovered. If you're sure you want to delete your FB Page you follow these steps.
But, first, make sure that you're an admin of the Page you're trying to delete. You won't see the delete option on a Facebook Page if you're not an admin.
Steps to delete Facebook Page using Android
- Open Facebook app on your Android device
- If you are already log-in, go to your Facebook Page
(If not then log-in by entering your user Id and password) - Now, tap the Gear icon (Settings) in the top right
- From the given options tap General
- Below Remove Page, tap Delete [Page name]?
- At last tap Delete Page.
You can also delete Facebook Page using iPhone. Here is a step-by-step guide you can follow to delete a Facebook Page using iPhone.
Steps to delete Facebook Page using iPhone
- Open Facebook app on your iPhone
- Next, visit your Facebook Page
- On the Facebook Page tap Settings (Gear icon) in the top right
- From the given options tap General
- Below Remove Page, tap Delete [Page name]?
- At last tap Delete Page.
Once you click delete, you'll have 14 days to restore the Page. To cancel your Page deletion, you have to visit your Page within 14 days of scheduling to delete your Page. From the settings (Gear icon) select General, scroll down tap Cancel Deletion>Confirm.
Keep in mind once your Facebook Page is deleted then nobody will be able to see or find it. You will even lose its content and data forever including Page likes, comments, interactions and reviews.
In case if you're unsure about losing all the data from your Facebook Page, then you can simply "unpublish" the Page. If you're an admin, you can unpublish your Page at any time. Unpublished Pages are only visible to the people who manage the Page. It won't be visible to the public until it's published again.
(Information source: Facebook help)
How to Deactivate or Delete Facebook Messenger

How do you deactivate or delete Facebook Messenger? It can be tricky, especially since deactivating your Facebook account doesn’t automatically deactivate or delete Facebook Messenger.
In the wake of Facebook’s massive data breach scandals, it’s no wonder users feel inclined to delete Facebook Messenger and their account; the harvesting of user data, and the Cambridge Analytica scandal have crushed Facebook’s stock price and left users fearing for their privacy. And if you thought deactivating your Facebook account was enough to protect you, it isn’t: Facebook Messenger holds exactly the same personal data and it can linger even after you’ve deactivated your Facebook account. The only way to permanently delete Facebook Messenger is to permanently delete your Facebook account.
Why you should also delete Facebook Messenger
Is Facebook Messenger private? Not really. It ranks poorly in our secure messaging app list because it tracks your behaviour, lacks a default encryption option, and doesn’t encrypt your past conversations. Moreover, it has access to your camera, microphone, and contacts.
Read about how to use social media cautiously and make your data as private as possible here.
How to deactivate Messenger
Deactivating Messenger is simple. However, if your Messenger account is connected to your Facebook account, you will have to deactivate your Facebook account first.
The following Messenger deactivation steps apply to both the iOS and Android platforms:
- Open Messenger.
- From Chats, click on your profile in the top left corner.
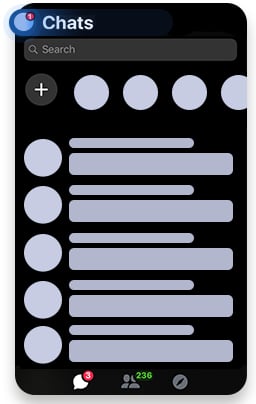
Tap Account settings. (Tap Legal and Policies for Android).
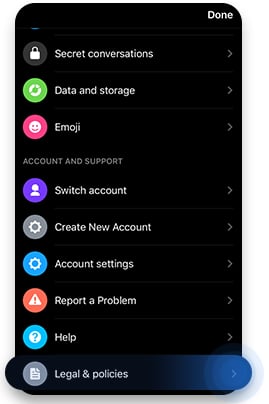
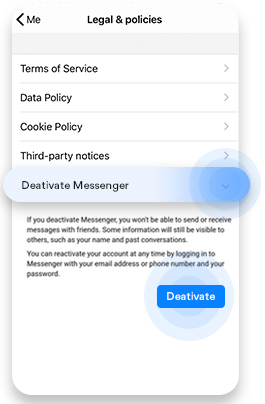
To reactivate Facebook Messenger, log in with your username and password.
Deactivating your Facebook account will not automatically deactivate your Messenger account as the app is separate from Facebook.
You can also create a new Messenger account using your phone number and name, not your existing Facebook account.
Can I deactivate Messenger without deactivating Facebook?
No, you can’t deactivate Facebook’s Messenger and keep your Facebook account. The only solution would be to turn your chat off by hiding your status and disabling notifications.
How to turn off Facebook Messenger
- Click on your profile picture in the top left.

Tap Active Status.
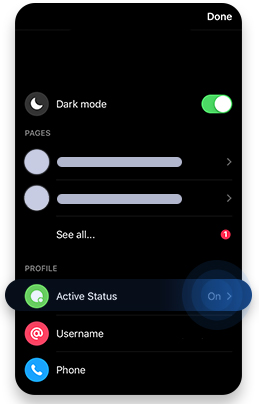
Use the toggle on top of the screen to turn your Active Status on or off.
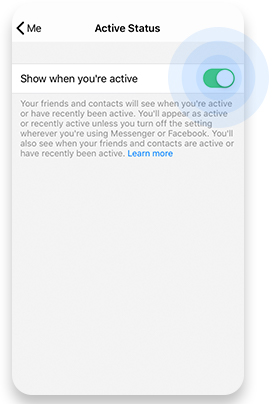
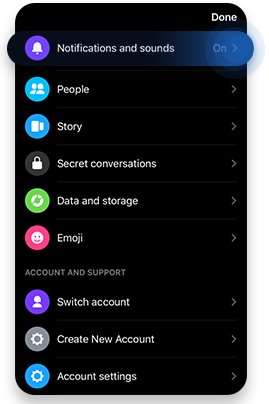
You will now be shown as inactive. You can also disable notifications by:
- Going to Notifications and Sounds.
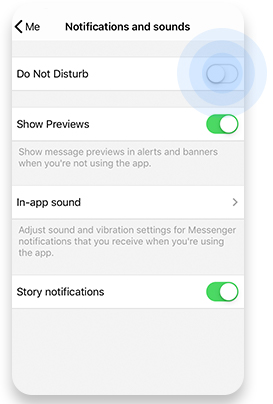
Turn on Do Not Disturb status.
How to delete your Messenger account
To delete Facebook Messenger completely, you will have to delete your Facebook account to remove all your data. Here's how:
- Log into Facebook, and click on the small arrow in the top right corner.
- Click “Settings”
- Click “Your Facebook Information” in the left menu panel.
- Click “Delete Your Account and Information.”
Once the deletion process begins, you won’t be able to reactivate your account or retrieve any of the content you’ve added to Facebook. Before confirming that you want to delete your Facebook account, however, you’ll be given the option to download your photos and posts.
If you’re using the stand-alone version of the app without having a Facebook account, you can deactivate messenger by following the points listed above or simply delete the app.
Choosing to delete Facebook Messenger is a great first step in securing your privacy on social media. However, if you use any other platforms, it's worth checking out our social media privacy tips to see how else you can secure your social life online.
Sign up for our monthly blog newsletter below for the latest cybersecurity and privacy tips!
Paul is a technology and art enthusiast who is always eager to explore the most up-to-date issues in cybersec and internet freedom. He is always in search for new and unexplored angles to share with his readers.
Comments
Post a Comment